Ever since I became owner of a swimming pool, a whole new set of chores and responsibilites were unlocked. Some are the repeating manual tasks of keeping the pool and the water clean for human use, while others are more technical and infrastructure related tasks that go along with keeping this very special reservoir of water that so much importance acquires in the hot days of summer.
While in a typical swimming pool some basic features are automated (for example controlling th pH, running the filtration or generating the correct amount of chlorine to disinfect the water), there are many others which by default are left to the intervention of a human.
One of the aspects that got me particularly concerned was the maintenance of the correct water level not being an automated process. Especially during the summer, a substantial amount of water is lost every day (at least 5 mm per day - depending on the environmental temperature and humidity). The water level dropping too much is problematic, because as the level approaches the bottom of the skimmer opening, it will cause the pump to ingest air, cavitate and unprime. If this persists for too long the pump will get damaged as its seals and bearings will seize in the absence of water.
With that in mind, I tried to come up with a solution with the following aspects in mind:
- simple design without many failure modes;
- be as much as possible based on off-the-shelf and easy to replace components;
- possible to monitor and remotely control if necessary;
- integrate with home automation;
- physically discrete and without any aesthetical impact to the swimming pool and its surroundings;
- not very expensive to implement and maintain.
While there are different types of solutions that one way or another cover the water level control aspect, these are in general either expensive, limited in terms of integration with other home automation platforms, or impossible to control remotely.
As such I decided to call for my ingenuity, and put together a custom solution that would tick all the boxes.
So basically the solution needed two components: a sensor installed in the swimming pool to detect the low level, and an automatic valve to inject tap water.
The sensor
Because I had good experience with Zigbee devices for their long battery life and ease of integration with home automation platforms, I decided to go for a very particular approach in respect to the sensor: retrofit a Aqara water leak sensor the serve the opposite purpose - detect lack of water instead of presence:
While ideally I would be looking for a proportional indication of the water level, so that for example I could also detect an excessively high water level (which will occur when it rains heavily), I could not readily find a solution that would not imply much more complexity and eventually custom parts.
The simplest approach would be to place this sensor inside the swimming pool, and have it setup so that when it would not detect water, the home automation would kick in and activate a valve. This would be the most basic approach . However it would have some implications: first, even though the Aqara sensor is waterproof, it is likely not designed to be permanently in contact with the water, and especially not water containing a certain concentration of chlorine and other chemicals. Also placing the sensor practically at the water level would seriously degrade the Zigbee signal strength. Lastly, as the water oscillates most of the time, debouncing logic would have to be added to ignore the false positives. This would also carry the implication that battery life would probably plummet, as the device would have to transmit much more often than normal.
This led me to think about a slightly more sophisticated approach. First, as I did not trust the sensor to be robust enough to tolerate being in contact with the water, I went for designing a custom enclosure where the Aqara sensor could be mounted inside and stay safe and dry all the time.
Because I became accustomed with modelling 3D objects for functional purposes since I bought a 3D printer, it proved to be a no brainer approach to create this enclouse myself and print it.
And so it was. The idea was to use a float switch connected to the Aqara sensor electrodes, so that when the water level would be low, the switch would close and trigger the sensor. For convenience and for keeping it visually discrete, the most logical choice was to put the device inside the skimmer cavity, supported under its cover:
Soon I learned that leaving the float sensor directly exposed to the water surface would lead to a lot of detection events, even while the water level was still substantially high.
This first version was still not based on 3D printed parts but rather on off the shelf parts cobbled together. Soon I found that the plastic enclosure was not a good solution as it would crack and let water in.
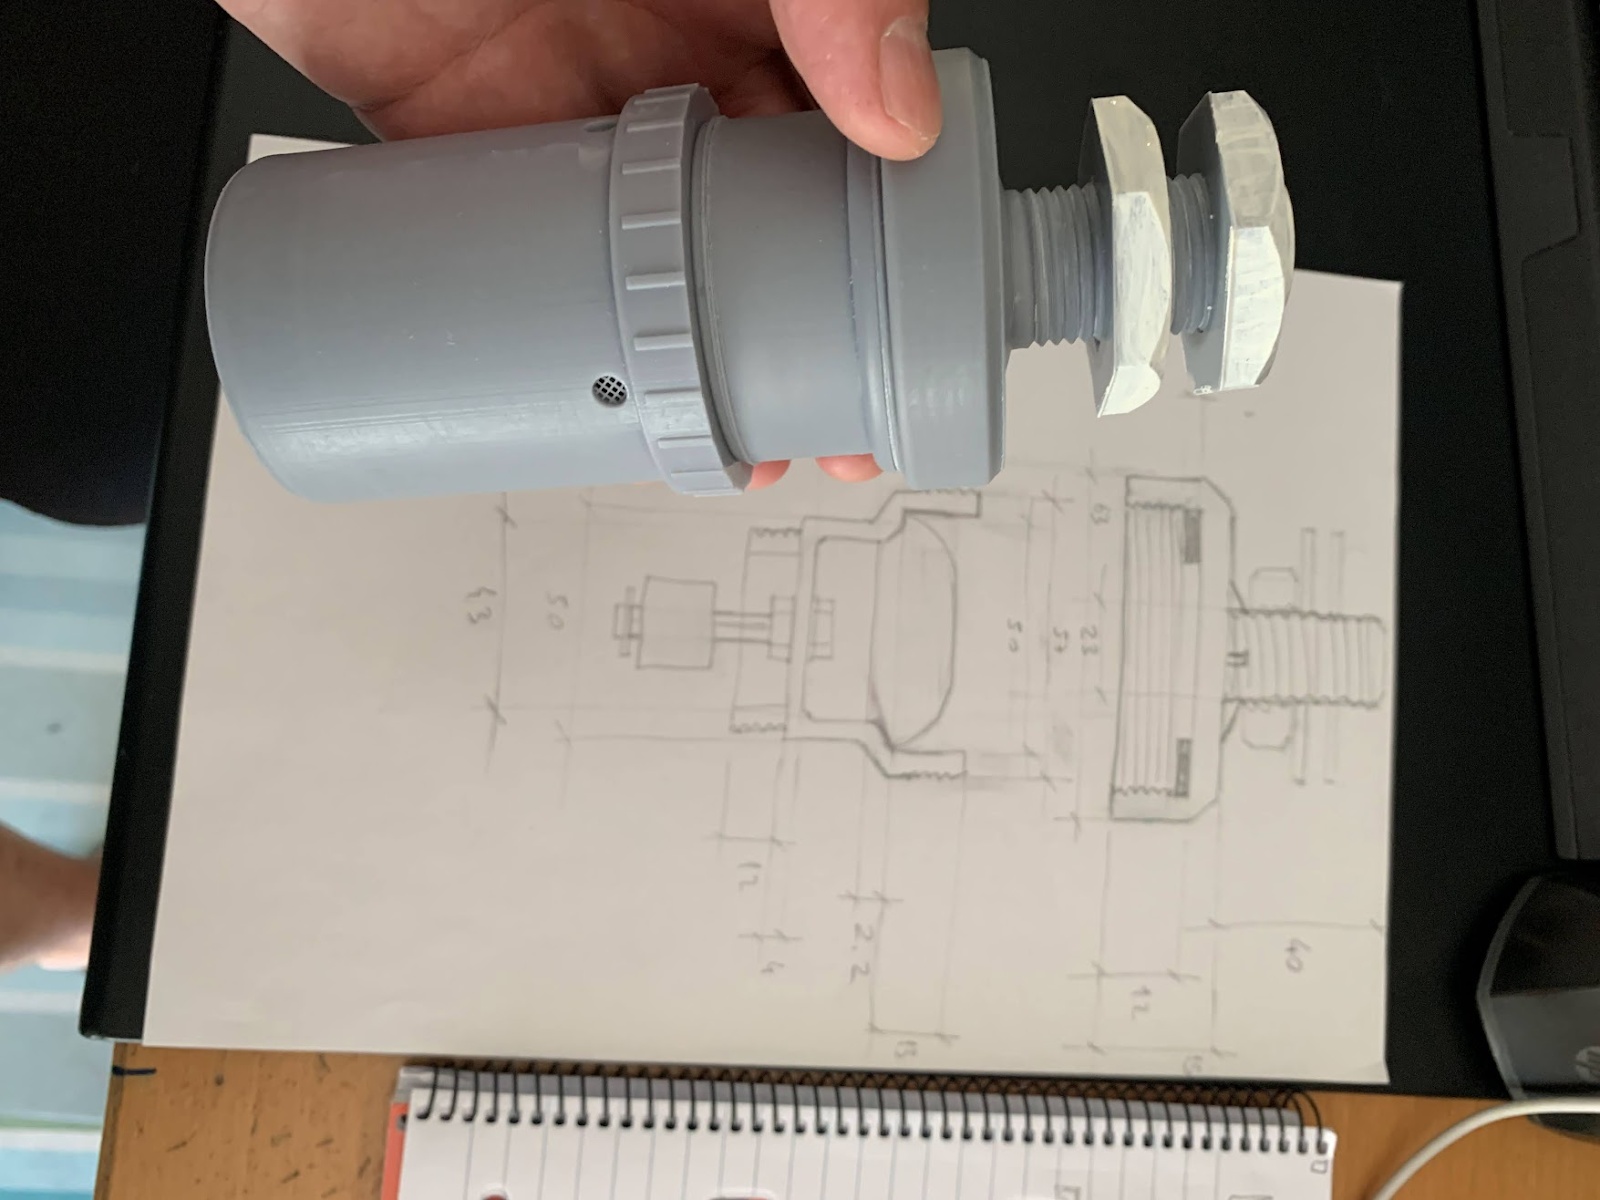
That is when I decided to make a 3D printed enclosure from scratch.
This enclosure would solve the excess events issue by measuring the water level not directly from the pool surface, but from the level of water inside a cup that would be part of the bottom of this enclosure:
This cup forms a kind of low pass filter for water waves: as the water is only be allowed in via small orifices, it takes some time for the level to rise and lower, effectively providing a damping behaviour to the variations in the water level as observed in the surface of the swimming pool.
So far, the resin material of the enclosure did not show any signs of wear due to the water or the chemicals present in it, and proved effective at keeping the sensor protected from water ingress. At the top cover right at the end of the threading, I have added a rubber seal, which is essential for keeping the enclosure water tight.
The actuator
With the sensor aspect resolved, it was time to cover the other aspect of the solution: how to automatically inject water into the swimming pool when needed?
Slightly overwhelmed with the idea of messing around with the swimming pool hardware, at first I considered using a modified sprinkler to send a jet of water to the swimming pool directly. But this idea seemed a bit cumbersome and would inevitably make the solution less discrete than desirable.
That is when I realized that it would not be such a big challenge to tap into the PVC pipes initially desiged for the installation of a heat pump:
With these I could effectively inject water into the swimming pool in a very discrete manner. Because the public water supply has a much superior pressure compared to the pool filtering pump (4 + bars compared to less than 1 bar for the latter), there should be positive flow even when the pump is running.
As so it was. I had to study a bit of plumbing in order to determine what fittings I had to buy and how to glue PVC-U piping parts together, but at the end it was a success:
Basically I had to add a 2" pipe to 3/4" inch reduction fitting, followed by a 3/4" elbow, followed by a retention valve (I wanted to make sure it would not be possible to have water from the swimming pool flowing towards the water supply - however unlikely that would be because of the pressure differences). Lastly the most important bit, the electronic valve that would open the water for injection.
For that I have chosen the GiEX QT06 Zigbee solenoid valve. This valve is normally used for garden irrigation, and it has the interesting feature of having a flow sensor that measures the injected water. Very useful for this application as well.
Before this valve I am also using a motorized ball valve which acts as a safety valve which I can close when not injecting water into the pool or having the irrigation running from the public water supply:
The integration of this valve is a bit more custom and uses a ESP8266 Wifi controller running Tasmota.
Because I am using Home Assistant as the "brains" of the house, and multiple Tasmota and other devices that communicate via MQTT messages, for integrating with these Zigbee devices I resorted to using a Sonoff Zigbee bridge flashed with Tasmota (https://zigbee.blakadder.com/Sonoff_ZBBridge.html) and Zigbee2Tasmota (on the Zigbee coordinator chip).
Then with all the hardware prepared and the Zigbee devices paired to the bridge (very simple procedure, some information can be found here - https://tasmota.github.io/docs/Zigbee/#introduction), this is where all the fun begins.
Configuring Home Assistant
On HA we need to define the entities that correspond to the Zigbee devices we are adding. In this case the level sensor and the valve.
For the valve I defined the following MQTT switch in the HA configuration.yaml file:
mqtt: switch:
- name: swimming_pool_water_injection
state_topic: 'tele/zbbridge/SENSOR'
value_template: >
{% for key, value in value_json.ZbReceived.items() %}
{% if 'Name' in value and value.Name == 'valve' %}
{% if 'WaterState' in value %}
{{ value.WaterState }}
{% endif %}
{% endif %}
{% endfor %}
command_topic: 'cmnd/zbbridge/zbsend'
qos: 1
payload_on: '{"device":"valve","Write":{"WaterState":1}}'
payload_off: '{"device":"valve","Write":{"WaterState":0}}'
state_on: '1'
state_off: '0'
availability:
- topic: "stat/zbbridge/RESULT"
payload_available: true
payload_not_available: false
value_template: "{{ (value_json['ZbStatus3'] | selectattr('Name', 'eq', 'valve') | map(attribute='LastSeen') | first | int) < 14000 }}"
retain: false
This implies that we first gave the valve a friendly name on the Zigbee bridge, via the ZBName command. For example in the Tasmota console:
zbname 0x2916,valve
Regarding the sensor, I have defined the following MQTT binary_sensor:
mqtt:
binary_sensor:
- name: swimming_pool_level_low
state_topic: "tele/zbbridge/SENSOR"
value_template: >
{% for key, value in value_json.ZbReceived.items() %}
{% if 'Name' in value and value.Name == 'level-sensor' %}
{% if 'Water' in value %}
{{ value.Water }}
{% elif 'ZoneStatusChange' in value %}
{{ value.ZoneStatusChange }}
{% endif %}
{% endif %}
{% endfor %}
device_class: problem
payload_on: '1'
payload_off: '0'
availability:
- topic: "stat/zbbridge/RESULT"
payload_available: true
payload_not_available: false
value_template: "{{ (value_json['ZbStatus3'] | selectattr('Name', 'eq', 'level-sensor') | map(attribute='LastSeen') | first | int) < 3300 }}"
This exposes the Zigbee level sensor as a binary sensor in Home Assistant, allowing it to be used in monitoring and automations.
For the automation I considered important to add some hysteresis (not trying to compensate the water level on every received event), and alert and give up if it tries to compensate too often:
- id: swimming_pool_water_level_low
alias: swimming_pool_water_level_low
trigger:
- platform: numeric_state
entity_id: sensor.total_swimming_pool_level_low
above: 3
condition:
condition: and
conditions:
- condition: template
value_template: "{{ (as_timestamp(now()) - as_timestamp(state_attr('automation.swimming_pool_water_level_low', 'last_triggered')) | float) / 3600 >= 24 }}"
# Data is only valid if it is being updated through the Zigbee gateway. If it is down, we cannot trust the sensors:
- condition: template
value_template: "{{ states('sensor.zbbridge_wifi_connect_count') != 'unavailable' }}"
- condition: numeric_state
entity_id: sensor.level_sensor_last_seen
below: 3100
action:
- service: script.multi_notification
data:
title: "Swimming pool level low!"
message: "Swimming pool level low! Compensating level."
# Set the zigbee valve to track the water quantity:
- service: mqtt.publish
data:
topic: "cmnd/zbbridge/zbsend"
payload: '{"device":"valve","write":{"WaterMode":1}}'
- delay:
seconds: 4
# Set the desired water quantity:
- service: mqtt.publish
data:
topic: "cmnd/zbbridge/zbsend"
payload: >-
{% set target_volume = states('input_number.swimming_pool_water_injection_amount') %}
{{ {"device":"valve","write":{"IrrigationTarget":target_volume}} | tojson }}
- delay:
seconds: 4
- service: switch.turn_on
target:
entity_id: switch.swimming_pool_water_injection
- service: switch.turn_on
target:
entity_id: switch.garden_valve
This automation will only starting injecting water if the level is low for more than 3 hours. Also it will refuse to compensate if the last time it injected water was less than 24 hours ago. Because this Zigbee valve has a flow sensor, we are able to tell it exactly how much water (in 1 liter increments) we want to add to the swimming pool.
Once all of this is setup I can monitor everything from the distance of a web browser and a comfortable chair:
Conclusion
With this solution I was able to monitor the water level, have Home Assistant inject water automatically and have one less thing to worry about especially in the Summer where this solution is most necessary as I am physically away from the site to be able to inject water manually.
In the future I plan to also support the opposite, which is to be able to remove excess water when the level is above the skimmer opening. This is also an important addition because in the most rainy periods of the year water will regularly rise above the skimmer port and render it ineffective at colecting debris. Also there is the risk of water infiltrating behind the liner, causing problems to the adhesion between the latter and the pool walls, ultimately leading to its detachment.


4 comments:
are the 3D model files available?
Not yet, but will publish these soon.
Im licensed pool builder. There is such a need for a autofill like this. Ive been researching how to a build a wifi one. This is very close to what i would come up with. My expertise is more on the Pool plumbing and the solenoid, Pool automation and field experience with Auto fills. loved that pick your brain and maybe help you with some of the swimming pool parts. I’m also in the position to install these and field test them.
Nice. I haven't yet taken the time to publish, but I have since custom made several other things for the swimming pool. One more substancial one was the construction of my own pH controller from scratch. Learned from the shortcomings of the commercial unit I was using and built a much more configurable and connected device.
Post a Comment